How to Back up your iPhone or iPad using iCloud and iTunes

Regularly back up your iPhone is important as more and more data is being stored on these devices. And its must important if you are updating your iPhone to latest iOS. In fact, online advice indicates that you can’t successfully upgrade an iPhone without a backup. Whether you upgrading to the iPhone 11 or update to iOS 17 you must create a backup first.
It’s a good idea to back up your device right before you update, that way if something goes wrong you’re not restoring to a backup created a few days ago, and all of your current information will be restored.
Well, iTunes and iCloud are different types of backup solutions offered by Apple to regularly backup your iPhone, iPad or iPad touch. When a backup is created from an iPhone, a snapshot of that device’s data is saved to somewhere other than the iPhone (a computer or cloud drive for example). So that you can restore your important data, photos if any cause you have accidentally deleted them or lose after iOS 17 update. Here this post we have step by step guide How to Back Up an iPhone using iCloud and iTunes.
How To Back Up Your iPhone
Well, you can use iCloud or iTunes backup solutions offered by Apple for backing up your iOS devices including iPhone, iPad or iPad.
Backup iPhone using iCloud
We can say iCloud is great option to backup iPhone because it stores your iPhone backup data in the cloud, rather than on your PC. So you can access your backup data from anywhere with Wi-Fi (as long as you know your Apple ID and password).
Using Apple’s iCloud service to back up your iOS device is the easier method. Each iCloud account is given 5GB of free storage for things like backups.
✔ Stores backups in iCloud
✔ 5GB free storage (payment needed for more)
✔ Encrypted backups
✔ Create and use backups over Wi-Fi
✔ Able to use the backup to restore to iPhone
How to back up iPhone to iCloud
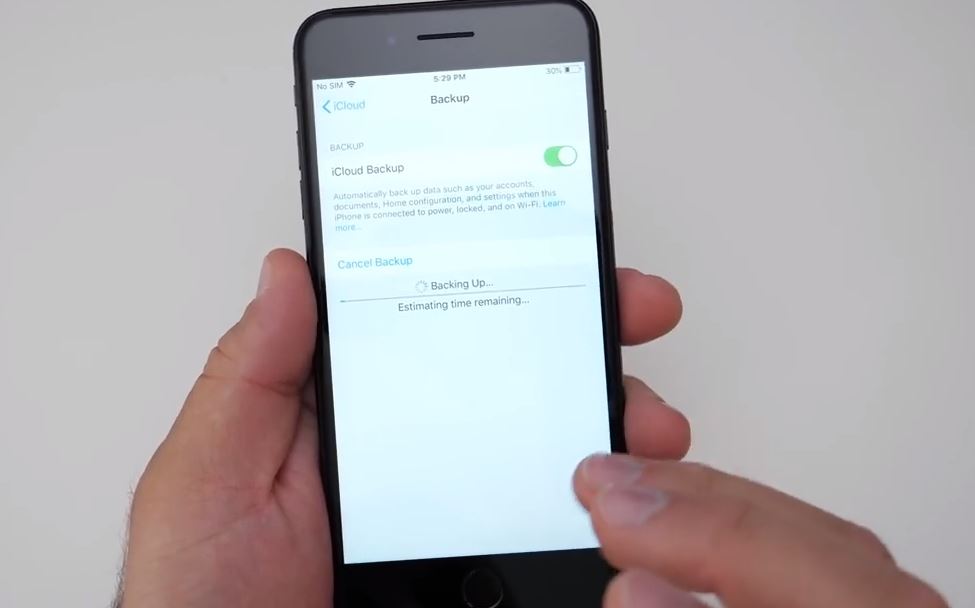
- Make sure you’re connected to a Wi-Fi network and also connect the charger.
- Open ‘Settings’ from the app screen on your iPhone.
- Tap your username entry. (Apple ID at the top of the screen)
- Scroll down and hit ‘iCloud’ > ‘iCloud Backup’. If you’re using iOS 10.2 or earlier, go to Settings, then scroll down and tap iCloud.)
- Tap ‘Back Up Now’.

Note: Stay connected to your Wi-Fi network until the process completes.
If you’ve never backed up to iCloud before, the first backup can take a while. After that, iCloud will only upload the changes you’ve made since the last backup, which is much faster.
To check and confirm that backup finished:
Tap Settings > [your name] > iCloud > iCloud Storage > Manage Storage, then select your device — the backup should appear in the details with the time and backup size. If you’re using iOS 10.2 or earlier, your path is Settings > iCloud > Storage > Manage Storage.
To Automatically back up with iCloud Backup:
- Make sure that iCloud Backup is turned on
- You can check and turn on this form Settings > [your name] > iCloud > iCloud Backup.
- If you’re using iOS 10.2 or earlier, go to Settings > iCloud > Backup
- Connect your device to a power source
- Connect your device to a Wi-Fi network
- Make sure that your device’s screen is locked
- Check that you have enough available space in iCloud for the backup
Backup iPhone using iTunes
Another way to back up your iOS device is to use iTunes. You’ll need a computer with the latest version of iTunes installed and an Apple Lightning cable. Well iTunes backup method is also similar to iCloud backup that you can use the backup to restore the snapshot to your iPhone. But the difference is iTunes backup stored on the local computer rather than in the cloud. So you no need to worry about cloud driver 5GB storage limit, but you won’t be able to access the backup over Wi-Fi on another computer.
✔ Stores backups on PC or Mac
✔ Optional backup encryption
✔ Create and use backups on your PC or Mac
✔ Able to use the backup to restore to iPhone
An iTunes backup doesn’t include:
- Touch ID settings.
- Unless you do an encrypted backup method in iTunes, you can’t backup things like Health, Activity, and Keychain data.
- Apple Pay information and settings.
- Photos stored in the cloud, iCloud Photo Library and like my Photo Stream.
- Content synced from iTunes, like imported MP3s or CDs, videos, books, and photos
- Content from the iTunes and App Stores or PDFs downloaded directly to iBooks (You can back up this content using Transfer Purchases in iTunes.)
How to back up iPhone to iTunes
Make sure you have the latest updated version of iTunes installed on your PC/mac
- Connect your iOS device to the computer and unlock it.
- Enter your PIN-code if prompted to approve a connection between the computer and device.
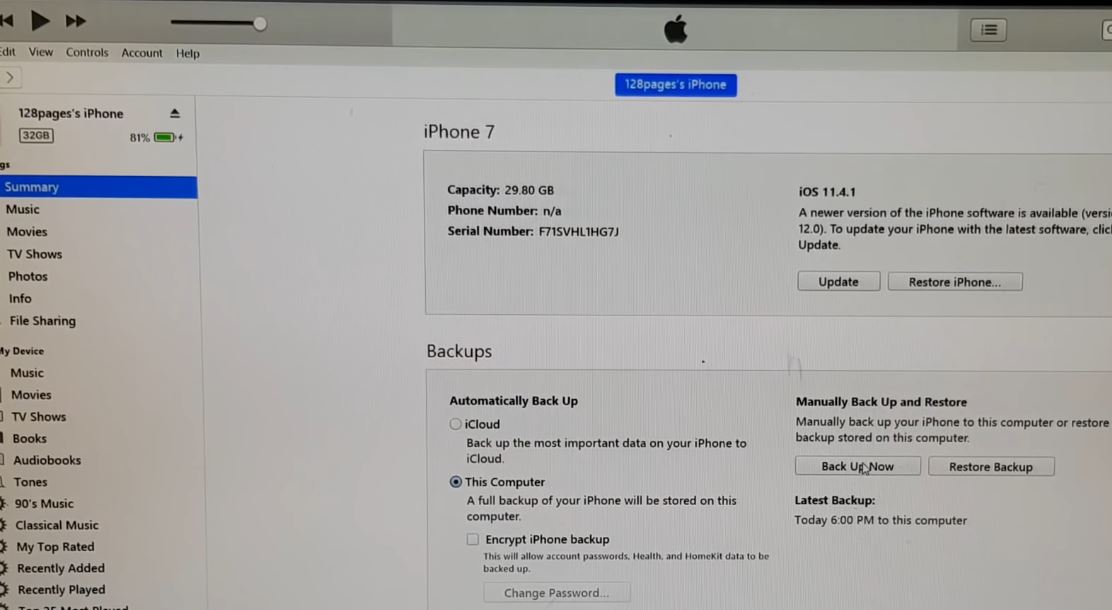
- In iTunes, click on the small thumbnail of your device next to the Music/Movies drop-down menu.
- With the Summary option selected on the left, you should see a screen full of details about your device.
- On that screen is also a Backups section.
- Then select the radio button “This computer” (You can also checkmark encryption to password protect the backup)
- Click Back Up Now and let iTunes work.
- A few minutes later, you’ll have an encrypted backup stored on your computer.

Note: An encrypted backup will prevent you from having to enter account passwords for apps like email or Facebook when restoring a device, as opposed to iCloud backups that can be hit or miss.
Find iOS backups on your Mac
Find a list of your backups:
Click in the menu bar. Type or copy and paste this: ~/Library/Application Support/MobileSync/Backup/ Press Return.
Locate a specific backup:
- Open iTunes. Click iTunes in the menu bar, then choose Preferences.
- Click Devices.
- Control-click the backup that you want, then choose Show in Finder.
You can Find iOS backups in Windows 7, 8, or 10
open Windows installed drive (basically C:) \Users\(username)\AppData\Roaming\Apple Computer\MobileSync\Backup\
Press Windows + R to open run, enter %appdata% or %USERPROFILE% (if you downloaded iTunes from the Microsoft Store) and click ok.
Double-click these folders: “Apple” or “Apple Computer” > MobileSync > Backup.
