The Default Gateway Is Not Available in windows 10 (Solved)

Did your computer lose internet connection after the windows update, And running network troubleshooter result, The Default Gateway Is Not Available? You are not alone several users report, the wifi disconnects automatically or there is no internet access and the troubleshooter results, “The Default Gateway Is Not Available”. Incorrect network settings and outdated drivers commonly cause this problem, Again third-party antivirus may also prevent you from accessing the internet. Let’s first understand, What is Default Gateway in computer networking?
What is a default gateway?
In computer networking, The default gateway is a network node or router that uses the internet protocol suite to forward traffic to other networks or the internet and back to you. For better understand, the Default gateway work as an intermediary or middleman between your local network and the World Wide Web.
To Find Your Default Gateway IP Address in Windows
- Open the command prompt as administrator,
- Type the command ipconfig and press enter key,
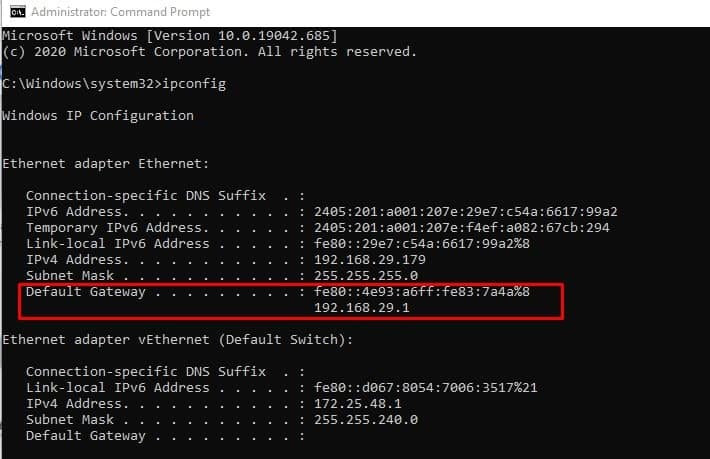
The default gateway is not available
If you are also having trouble accessing the internet or getting The default gateway is not available error apply the solutions listed below.
- Temporarily disable or uninstall third-party antivirus
- Disconnect VPN if configured on your computer and check the status of the problem.
- Also, perform a clean boot to check and make sure any third-party application not causing the issue
Restart network devices
Power-cycling your router and your computer fix the problem if a temporary glitch causing the issue.
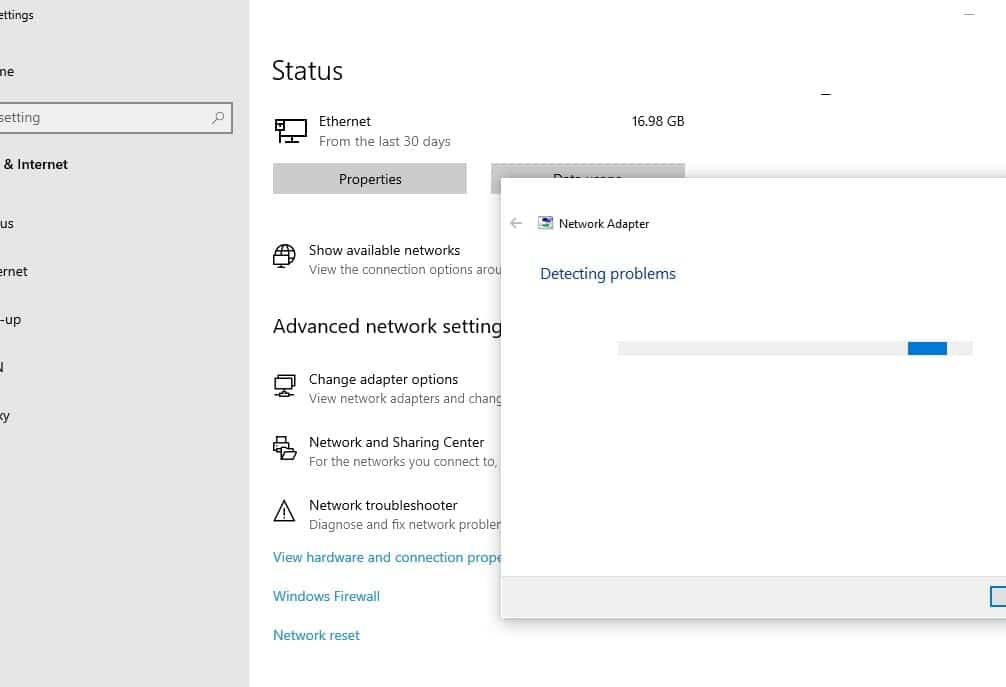
Run Network troubleshooter
Let’s first run the built-in network troubleshooter that automatically diagnose and fix problems that prevent or cause default gateway not available on Windows 10.
- Press the Windows key + X select settings,
- Click on Network & Internet then network troubleshooter,
- Select the network adapter or select all options and click next to start diagnosing and allow fix problems causing the issue.
- The troubleshooter look for incorrect network settings, or if any outdated driver prevents internet connection and try to fix them itself.
- Once done restart your computer and check the status of your problem.
Reinstall Network Adapters Driver
Most of the time due to an outdated network driver your network adapter fails to get an IP or Default IP address from the router. Reinstalling the network adapter driver is probably a good solution to fix the problem.
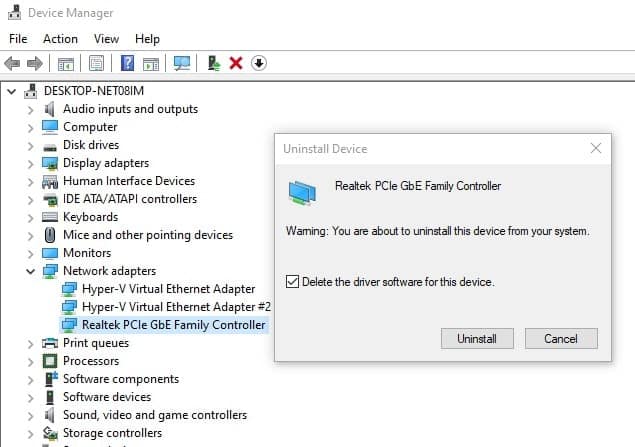
Uninstall the network adapter driver
- Press the Windows key + X select device manager,
- This will display all installed device driver list,
- locate and expand the network adapters right click on network driver select uninstall the device,
- Checkmark on delete the driver software for this device and click uninstall again,
- Once done reboot your computer. On the next start windows automatically install the default network driver on your PC.
Install network adapter driver
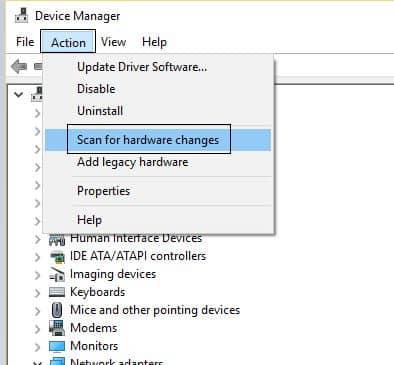
- Now again access the device manager using devmgmt.msc
- Click on the action then scan for hardware changes,
- This will find and install the default network adapter driver for your computer.
If windows didn’t install the default network driver then you need to visit your manufacturer’s website to download and install the driver from there.
Reset network connections
Let’s reset the network connection to its default settings which probably help fix the problem.
Open CMD as an administrator, copy and paste the following commands by pressing the enter key the end of each command line:
- netsh winsock reset
- netsh int ip reset
- ipconfig / release
- ipconfig / renew
- ipconfig / flushdns
Once done, restart your computer and check the status of the problem.
Check Windows IP address settings
- Press Windows key + R, type ncpa.cpl, and click ok,
- This will open the network connections window,
- right-click on the active network adapter select properties,
- locate Internet Protocol Version 4 double click on it to open its properties,
- Here select the radio button to Obtain an IP address automatically and Obtain DNS server address automatically.
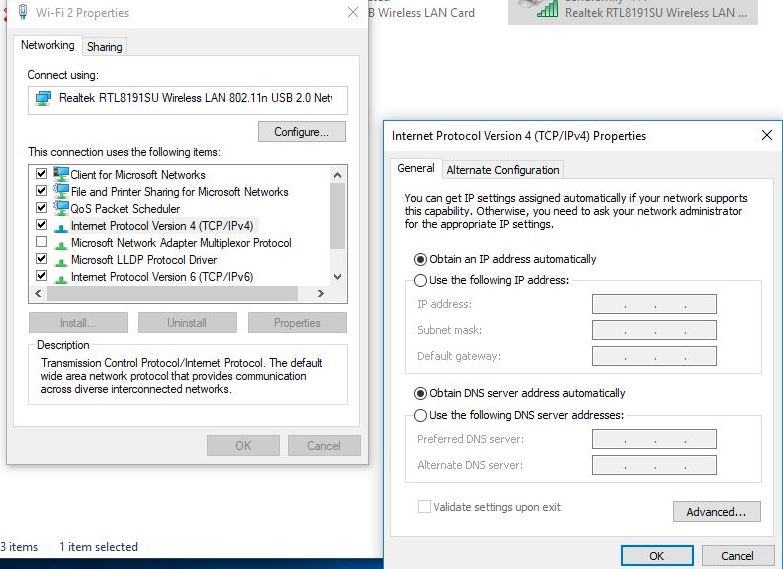
- If it’s already selected then click on use the following IP address.
- Then type the IP address as below image (For example if your Router IP address is 192.168.1.1)
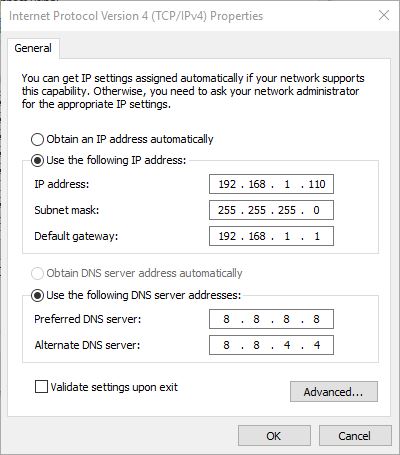
- Checkmark on Validate settings upon exit and ok apply to make save changes. Now check the problem is resolved or not.
Change the power-saving mode
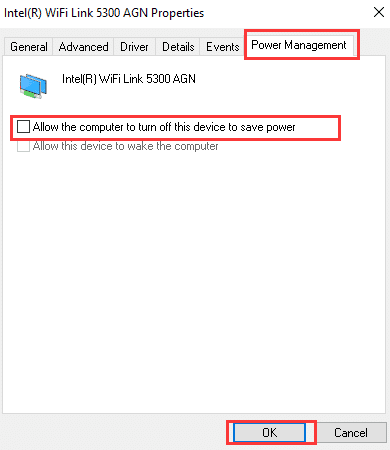
- Open the Device Manager using devmgmt.msc.
- Expand the Network adapters to find the network adapter that you are currently using.
- Right-click on it and choose Properties.
- Move to the “Power Management” tab and uncheck the “Allow the computer to turn off this device to conserve power” option.
- Click “OK” to save the change.
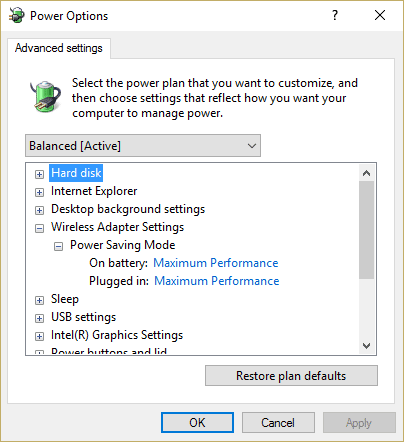
- Press Windows key + R, type powercfg.cpl and click ok,
- Click “Change plan settings” next to the power plan which you use.
- At the bottom click on “Change advanced power settings.”
- Expand Wireless Adapter Settings, then again expand Power Saving Mode.
- Next, you will see two modes, ‘On battery’ and ‘Plugged in.’ Change both of them to Maximum Performance.
- Click Apply followed by Ok. Reboot your PC to save changes.
Reset network settings windows 10
- Select the Start button, then select Settings
- Go to Network and internet then Status click on the network reset
- On the Network, reset screen select Reset now > Yes to confirm.
Restart your computer and check the status of your problem.
